Welcome back
You know what? I missed blogging this blog. Most of my normal blogging is "important" and "thought-provoking", and I'm just glad for a minute that I have this blog where I can be merely useful and informative.
So welcome. I missed you, too.
Most of the entries so far have been basic tool entries – how to use the straight-up tools like "magic wand" and "color select" to get something cool to happen. Well, it turns out that the GiMP has some rather mad filters which can do stuff that you could prolly do by hand if you were insane and didn’t have to eat, work, or use the potty. These filters can just save you time and create … stuff.
The difference between a "filter" and a "tool" is that "filters" reside in the "Filters" menu, and they are generally applied to the whole image at once – or for you intermediate users, to a selected area of the image you're working on.
I have an image you can practice on all picked out as we apply 3 basic filters today:
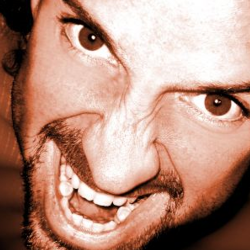
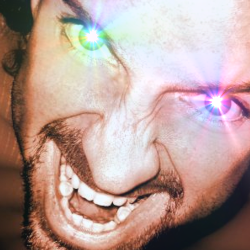
Nice face, right? That's an image downloaded from stock.xchng from a photographer whose user ID is "Sammylee". It'll be our test case for these filters. Drop down the "Filters" menu and take a look at it.
We could walk you through boring junk like blurs and red-eye removal, but what if our crazy face here is a supposed to be a super mutant with psionic energy that is bursting out of his eyes? Is knowing the difference between "Gaussian blur" and normal "blur" going to get that done? No, it's not, so let's not, let's do something worth doing. Go down the menu to "Light and Shadow" and when the next popup menu shows itself, choose "Supernova". You get something like this:
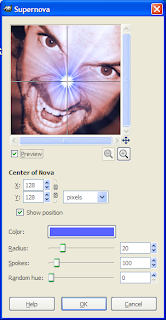
Now, obviously, the giant radioactive zit on this guy's nose is not impressing anybody. But to get that crazy psionic energy coming out his eye instead of the pores on his nose, use your mouse to move the center of the Supernova in the preview screen to the part of his face (one of his eyes) we want the effect to actually be in. I'm choosing his right eye (which is on our left).
Once the center of the effect is where I want it, I'm going to manipulate the sliders to get the filter to look like something manageable, thus:
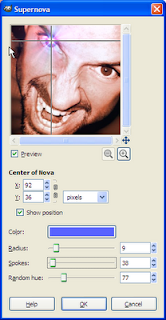
For those of you who aren't following what happened, I reduced the diameter of the center of the effect to 9 pixels; I changed the "spokes" to 38, and I upped the "random hue" value to 77 to make the colors in the spokes rotate randomly. The higher the value there, the more random the color generated. I'm going to repeat the process for the other eye leaving all the settings exactly the same – just moving the center to the other eye, and I get this:
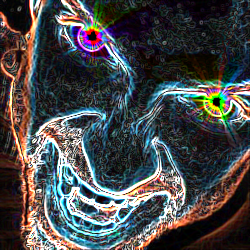
Weird, right? Now, check this out: select "Edge-detect" from the "Filters" menu, and choose "Edge…". Don't ask any questions – just click "OK", and you get this image:
Now, that's crazy, right? But if you fiddle with the color mode and brightness/contrast setting, you can get this:
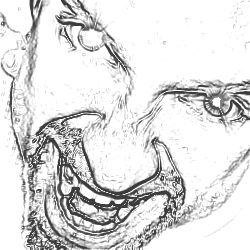
Which looks like a line drawing or a pencil sketch. Nice, huh?
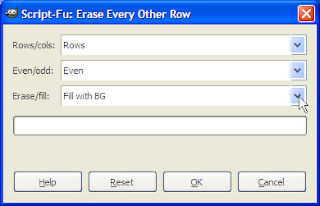
OK – that's two filters. Here's the third and then I'm out of here. Go down the "Filters" menu to "Distorts" and select "Erase every other row". You get this dialog:
Now, before you hit "OK", make sure your FG/BG color is set so that the BG color is BLACK, and then set the "Erase/fill:" drop-down to "fill with background". Now click "OK" and you get this:
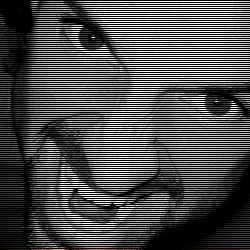
Like an old-time low-res TV image.
Now, play with the filters there in the Filter menu, and we'll come back with a project that you can try out with me to see how Filters and Tools interact with each other.
Sorry to be gone so long; thanks for your patience.
So welcome. I missed you, too.
Most of the entries so far have been basic tool entries – how to use the straight-up tools like "magic wand" and "color select" to get something cool to happen. Well, it turns out that the GiMP has some rather mad filters which can do stuff that you could prolly do by hand if you were insane and didn’t have to eat, work, or use the potty. These filters can just save you time and create … stuff.
The difference between a "filter" and a "tool" is that "filters" reside in the "Filters" menu, and they are generally applied to the whole image at once – or for you intermediate users, to a selected area of the image you're working on.
I have an image you can practice on all picked out as we apply 3 basic filters today:

Nice face, right? That's an image downloaded from stock.xchng from a photographer whose user ID is "Sammylee". It'll be our test case for these filters. Drop down the "Filters" menu and take a look at it.

We could walk you through boring junk like blurs and red-eye removal, but what if our crazy face here is a supposed to be a super mutant with psionic energy that is bursting out of his eyes? Is knowing the difference between "Gaussian blur" and normal "blur" going to get that done? No, it's not, so let's not, let's do something worth doing. Go down the menu to "Light and Shadow" and when the next popup menu shows itself, choose "Supernova". You get something like this:

Now, obviously, the giant radioactive zit on this guy's nose is not impressing anybody. But to get that crazy psionic energy coming out his eye instead of the pores on his nose, use your mouse to move the center of the Supernova in the preview screen to the part of his face (one of his eyes) we want the effect to actually be in. I'm choosing his right eye (which is on our left).
Once the center of the effect is where I want it, I'm going to manipulate the sliders to get the filter to look like something manageable, thus:

For those of you who aren't following what happened, I reduced the diameter of the center of the effect to 9 pixels; I changed the "spokes" to 38, and I upped the "random hue" value to 77 to make the colors in the spokes rotate randomly. The higher the value there, the more random the color generated. I'm going to repeat the process for the other eye leaving all the settings exactly the same – just moving the center to the other eye, and I get this:

Weird, right? Now, check this out: select "Edge-detect" from the "Filters" menu, and choose "Edge…". Don't ask any questions – just click "OK", and you get this image:

Now, that's crazy, right? But if you fiddle with the color mode and brightness/contrast setting, you can get this:

Which looks like a line drawing or a pencil sketch. Nice, huh?
OK – that's two filters. Here's the third and then I'm out of here. Go down the "Filters" menu to "Distorts" and select "Erase every other row". You get this dialog:

Now, before you hit "OK", make sure your FG/BG color is set so that the BG color is BLACK, and then set the "Erase/fill:" drop-down to "fill with background". Now click "OK" and you get this:

Like an old-time low-res TV image.
Now, play with the filters there in the Filter menu, and we'll come back with a project that you can try out with me to see how Filters and Tools interact with each other.
Sorry to be gone so long; thanks for your patience.

